Ahh, the Front Plank. The staple of core training. When someone says “I want to work on my core”, they almost inevitably throw in a plank variation – which is great but only as a starting point. Now, don’t get us wrong – there must be a certain level of mastery over the movement to earn the progressions, but it’s just a building block in a larger picture.
But let’s break the Front Plank down a bit first.
To begin with, why do we want to do the plank at all? The simplest way to think about it is to look at the “core” as a broad term that covers… well, a lot. In fact, if we’re being honest, the term itself is kind of a junk one because it’s so broad that it loses its meaning. So for the sake of this discussion, we’re going to look at a very specific part of the “core” – the trunk. The middle part that represents the halfway point between the lower and upper body. Metaphorically speaking, the trunk operates like the axle in the car – it’s the transfer point of energy from one half to the other. Make sense? How about we use a specific movement to demonstrate what we’re talking about: the wall ball.
When you’re doing this exercise, it initiates when you perform what’s called the “counter-movement” – so you drop down into the squat (away from the direction the ball is about to travel… hence the term “counter-movement”) then extend your knees, hips, arms and ankles (in that order) until you’re fully extended and the ball leaves your hands to fly up towards the ceiling. The importance of the trunk stability/strength is that all the energy you’re creating in your legs must transfer through your midline to reach your arms – and if your trunk isn’t stabilizing enough to handle this transfer you will get (at the very least) an inefficient expression of power. So we need to make sure that our trunk has the ability to stabilize in order to allow all this energy you’re creating to flow smoothly from bottom to top, and the way to do so is to develop a “static stability” and then move into a “dynamic stability”.
To do a Front Plank correctly, go down on your knees and place your forearms in front of you on the floor. Shift your weight so that your elbows are directly under your shoulders, and your eyes are looking straight down between your wrists. Holding this position, walk your legs back one at a time until they are both extended – and bada-bing-bada-boom, you’re in the plank. Being sure to keep breathing, hold this position as long as you can (up to 60 seconds – there’s no need to hold it any longer than this) and if you can maintain a solid position this entire time, without wobbly hips or shaking all over the place, you’re ready for the next level.

As an aside – a perfectly valid argument could be made that the next logical step would be a Front Plank on a Stability Ball, and you may want to try this or work it into your programming for 3-4 weeks. The reason we didn’t include it is that although there is a greater challenge due to the instability of the ball (ironic, given its name) it’s offset by the fact that the upper body is elevated.
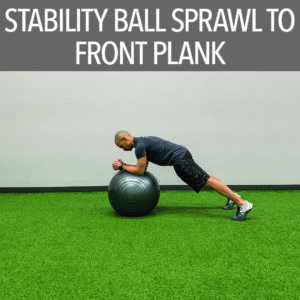
Once you’ve cleared the Front Plank (and possibly the stability ball version), we want to start working on stabilizing that power-transfer junction with movement – so we do what’s called the “Stability Ball Sprawl to Front Plank”. Place your hands on the stability ball and bend your knees/hips, going into a sprawl position on the ball. Push/roll the ball forward while keeping your hands in contact, finishing when the forearms are resting on the ball and you’re in the plank. Pause just long enough that the trunk’s musculature engages to hold the position, then roll it back and return to the hands-on-the-ball sprawl position.

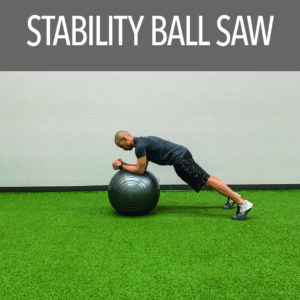
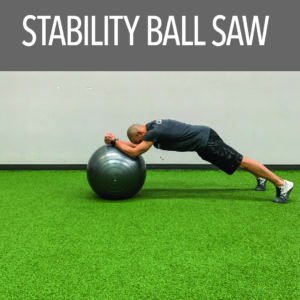
Lastly – onto the Stability Ball Saw.
Now, a quick caveat: this little exercise can be a bit of a nasty surprise. It doesn’t look like a lot, but it can leave your anterior trunk core (your “abs”), pretty sore the first couple of times you do it. That’s because although there isn’t a lot of movement, you are increasing the distance between the elbows and the toes and thereby increasing the required amount of effort needed from those abs – and all while holding the plank. So due to the “time-under-tension” (despite the amount of tension fluctuating) creates the perfect recipe for some low-to-mid grade DOMS (Delayed Onset Muscle Soreness).
To perform the Stability Ball Saw go into a proper Front Plank on the ball – forearms resting on it, weight on your toes, shoulders over your elbows, eyes looking roughly between the wrists (when looking straight down at the ball) and NOT resting your chest on the arms. Holding this position, push the forearms forward as far as you are capable WITHOUT a change in the position of your hips/trunk, pause for a half-second (this should be a controlled movement, not a frantic one) then pull the elbows back under the shoulders. We recommend doing this close to a wall, so that if you underestimate the difficulty the ball’s range of movement is limited and won’t shoot out from under you.
Remember, make sure that you’ve “owned” each level before you move on to the next one, and if you’re unsure check in with us.
All for now – till next time, train smart, train hard and have fun!